 Save
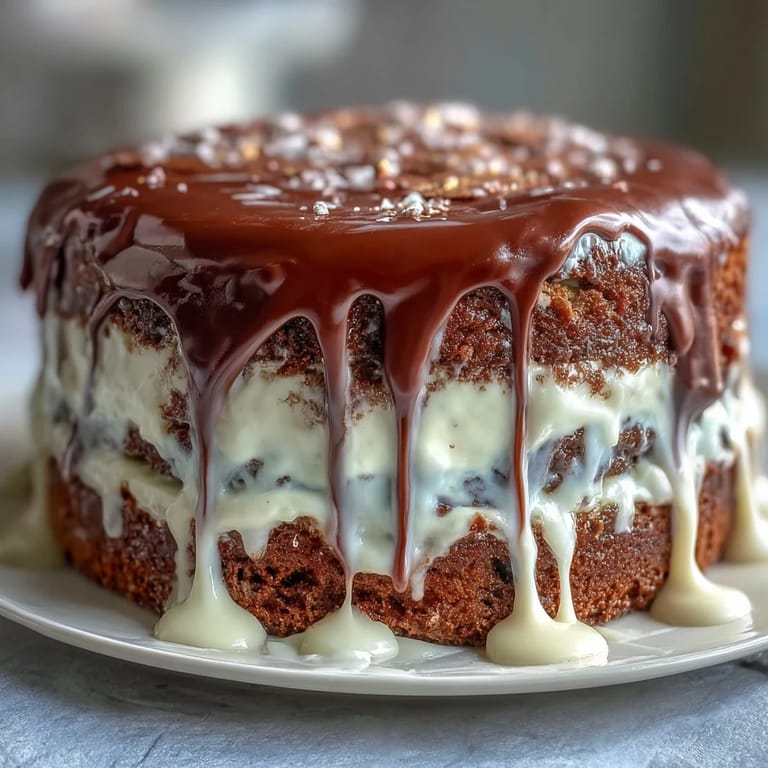
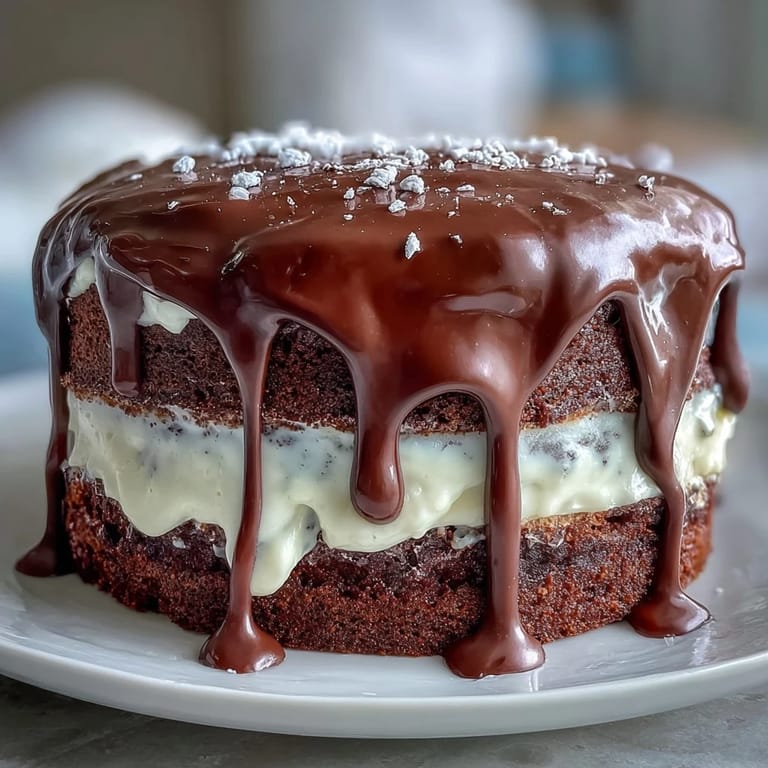
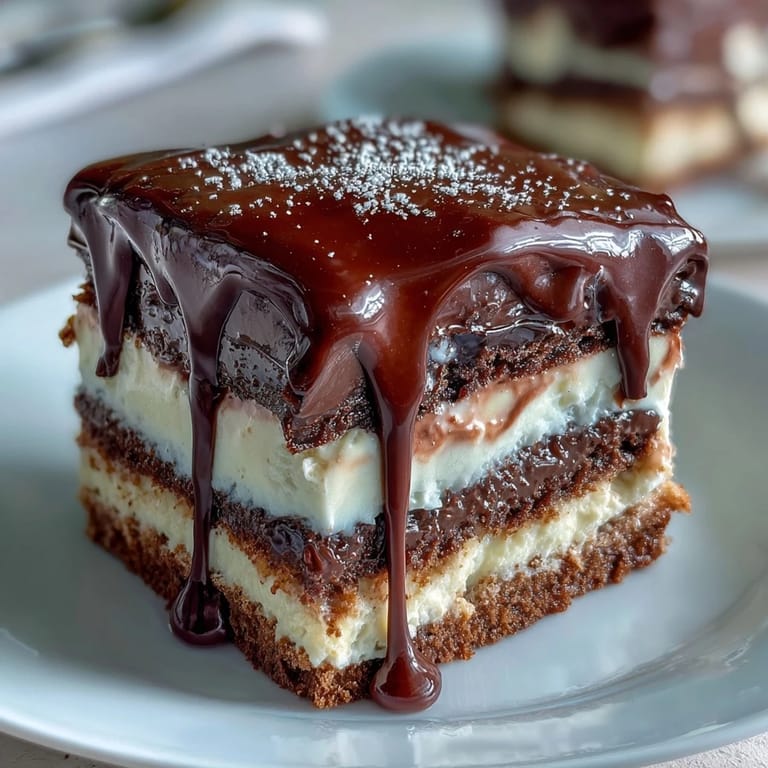
Save My cousin called me three weeks before graduation, voice trembling with excitement, asking if I could bake her a cake that felt as monumental as the moment itself. She wanted white chocolate, something elegant but playful, something that would make her guests gasp when they walked into the room. Standing in my kitchen that afternoon, I realized this wasn't just about cake—it was about crystallizing a memory into layers of vanilla sponge, silky frosting, and cascading white chocolate that would frame her achievement in something edible and beautiful.
I'll never forget watching my cousin's face light up when she saw it on the dessert table—the way she ran her finger along the white chocolate drip (yes, I pretended not to notice) and laughed like a teenager. Her friends circled it immediately, phones out, and suddenly this cake wasn't just dessert; it was the centerpiece of her memory. That's when I understood why celebration cakes matter: they're edible proof that someone believed in you enough to create something beautiful.
Ingredients
- All-purpose flour (2 ½ cups): The foundation of your sponge; make sure it's fresh and aerated by sifting, which creates a lighter crumb structure.
- Baking powder (2 ½ tsp): This is your rise guarantee; don't skip the whisking step because clumps will bake into gritty pockets.
- Unsalted butter (1 cup for sponge, 1 cup for buttercream): Room temperature is non-negotiable here—cold butter won't cream properly and you'll lose volume and tenderness.
- Granulated sugar (2 cups): Beat it with butter long enough to see the mixture pale; this incorporates air that makes the cake light.
- Large eggs (4): Room temperature eggs incorporate better into the batter, creating a silkier crumb; take them out of the fridge 20 minutes before starting.
- Pure vanilla extract (1 tbsp plus 1 tsp): Quality vanilla carries this whole cake—cheap extract tastes harsh and thin.
- Whole milk (1 cup): Room temperature milk combines smoothly without shocking the batter; this keeps everything tender.
- Powdered sugar (4 cups): Sift it before using to avoid lumpy buttercream that looks grainy no matter how much you beat it.
- White chocolate (6 oz for buttercream, 6 oz for drip): Melted and cooled white chocolate adds silkiness and subtle sweetness that elevates the frosting beyond standard vanilla.
- Heavy cream (2–3 tbsp for buttercream, ¼ cup for drip): This is your texture control—add gradually because too much creates a soupy frosting, too little and it'll be stiff.
- White chocolate crispy pearls or malt balls (1 cup): These become your golden balloons; choose ones sturdy enough to hold a toothpick without crumbling.
- Edible gold spray or luster powder: A small investment that transforms simple pearls into something that catches light and feels genuinely celebratory.
Tired of Takeout? 🥡
Get 10 meals you can make faster than delivery arrives. Seriously.
One email. No spam. Unsubscribe anytime.
Instructions
- Ready Your Workspace:
- Preheat your oven to 350°F and line three 8-inch round pans with parchment paper, pressing it into corners so it stays put. Greasing under the parchment creates a buffer that lets cakes release cleanly.
- Combine Your Dry Ingredients:
- Whisk flour, baking powder, and salt together in a medium bowl, making sure everything is evenly distributed so you don't bite into a pocket of baking powder later. Set this aside and don't skip the whisking—it aerates the flour.
- Cream Butter and Sugar:
- In your largest bowl, beat softened butter and sugar for about three minutes until it looks pale and fluffy, like whipped cream. This step is where the magic happens; you're not just mixing, you're incorporating air that makes the cake light and tender.
- Incorporate Eggs and Vanilla:
- Add eggs one at a time, beating after each addition so they fully incorporate before the next one arrives. This prevents a curdled-looking batter that bakes into a dense cake; after the last egg, add vanilla and mix until the whole thing looks silky.
- Alternate Flour and Milk:
- With the mixer on low speed, add a third of your flour mixture, then half the milk, then another third of flour, then the remaining milk, finishing with the last of the flour. Always begin and end with dry ingredients; this keeps the batter emulsified and prevents deflation.
- Fill and Bake:
- Divide batter evenly among the three pans—use a scale if you're feeling precise—and smooth the tops with an offset spatula. Bake for 30 to 35 minutes until a toothpick inserted in the center comes out clean or with just a few moist crumbs clinging to it.
- Cool Properly:
- Let cakes rest in their pans for ten minutes before inverting onto wire racks to cool completely; this prevents them from shattering or tearing. Cool thoroughly before frosting or the buttercream will slide off—trust me on this one.
- Prepare Your Buttercream:
- Beat softened butter until it's smooth and pale, then gradually add sifted powdered sugar in small batches, mixing well between each addition. Pour in your melted and cooled white chocolate, vanilla, salt, and start with 2 tablespoons of cream, beating until the frosting looks light and fluffy like clouds.
- Assemble the Base:
- Level your cooled cakes if the tops domed, place the first layer on your serving plate, and spread a generous layer of buttercream on top. Stack the second cake, add more buttercream, then the third layer, and finish by applying a thin crumb coat all over the cake.
- Chill for Crumb Coat Success:
- Refrigerate the cake for 30 minutes so the crumb coat sets and won't mix with your final frosting layer. This step feels like waiting, but it prevents a muddy, unpolished-looking cake.
- Apply Final Frosting:
- Spread a thick, generous coat of buttercream over the entire cake, smoothing the sides and top with an offset spatula dipped in warm water for a flawless finish. Step back and admire before moving to the drip.
- Create the White Chocolate Drip:
- Heat heavy cream until it just begins to simmer, pour it over chopped white chocolate, let it sit for one minute undisturbed, then stir gently until completely smooth and glossy. Cool this ganache to room temperature before using so it drips dramatically but doesn't melt into the buttercream.
- Execute the Drip:
- Using a spoon or squeeze bottle, carefully drip white chocolate ganache around the top edge of the cake, letting gravity pull it down the sides in irregular, artistic streams. Fill the center with additional ganache and smooth it into the top layer for a polished, professional look.
- Gold Balloon Magic:
- Spray your white chocolate pearls or malt balls with edible gold spray in a well-ventilated space, or roll them in gold luster powder mixed with a tiny bit of alcohol for coverage. Let them dry completely, then insert toothpicks or thin cake wires into each one.
- Arrange and Celebrate:
- Cluster your golden balloons on top of the cake in a festive arrangement, positioning them so they stand at different heights for visual interest. Chill the finished cake until you're ready to serve, then bring it to room temperature for 30 minutes before slicing so the crumb stays tender.
 Save
Save Halfway through frosting my cousin's cake, her little brother wandered into the kitchen and watched me work in total silence, finally asking if I was nervous about messing it up. I told him the truth: that imperfection in celebration cakes is actually permission to be human, and that the cake would taste equally delicious whether the drip was perfectly symmetrical or charmingly wobbly. He nodded seriously, then licked a fingerful of buttercream off a bowl and declared it the best thing he'd ever tasted—and suddenly, that's what the cake became about.
Why Room Temperature Ingredients Matter
When I was first learning to bake, I ignored the room temperature instruction because I thought it was fussy and unnecessary. My cakes came out dense, grainy, and looked sadly deflated compared to my mother's. Years later, I finally understood: room temperature ingredients emulsify properly, creating a stable batter that rises evenly and holds air. Cold eggs and butter are like trying to blend oil and water—they resist combining, and you lose all the volume that makes this cake tender. Taking butter and eggs out of the fridge 20 minutes before baking isn't perfectionism; it's engineering success.
The Sifting Secret That Changes Everything
I discovered the importance of sifting powdered sugar by making a batch of buttercream for a friend's birthday and feeling absolutely mortified when she bit into a spoonful and crunched on a lump of unsifted sugar. The frosting looked smooth, but hidden inside were little pockets of sweetness that never dissolved. Now I sift powdered sugar before adding it to anything, and I can taste the difference—the frosting is silky, consistent, and luxurious from the first spoonful. It takes an extra two minutes and makes an enormous difference in how professional your final cake looks and tastes.
White Chocolate: The Ingredient That Requires Respect
White chocolate is temperamental in ways that dark chocolate isn't—it scorches easily, seizes when exposed to even a drop of water, and separates if you let it get too warm. I've ruined more batches of white chocolate frosting by rushing the melting process than any other mistake. The secret I learned through trial and error is to melt it low and slow, either in a double boiler or in 15-second bursts in the microwave, stirring between each pulse. When it goes into the buttercream, it needs to be completely cooled or it'll split the emulsion and you'll end up with a grainy, separated mess. Patience with white chocolate is the difference between frosting that looks silky and frosting that looks curdled.
- Always chop white chocolate finely so it melts evenly without hot spots.
- Cool melted white chocolate completely before stirring it into your buttercream to prevent seizing.
- If your white chocolate buttercream does separate, beat in a tablespoon of milk at a time until it comes back together.
 Save
Save Baking this cake taught me that celebration doesn't have to be complicated to be meaningful—it just has to be made with intention. When you slice into these layers on someone's important day, they'll taste the care in every vanilla note and see their own joy reflected back at them in white chocolate and gold.
Recipe FAQ
- → How do I achieve a smooth white chocolate buttercream?
Beat butter until creamy, gradually add sifted powdered sugar, then incorporate melted white chocolate and cream. Beat until light and fluffy for a smooth texture.
- → What’s the best way to create a white chocolate drip?
Heat heavy cream and pour over finely chopped white chocolate. Let sit briefly, then stir until smooth. Cool slightly before dripping over the chilled cake edges.
- → How can I make the gold balloon decorations edible and festive?
Spray white chocolate crispy pearls or malt balls with edible gold spray or dust with gold luster powder. Allow to dry before arranging on the cake with toothpicks or wires.
- → How long should the cake be chilled before decorating the drip?
After applying the crumb coat, chill the cake for about 30 minutes to firm the surface for a neat drip application.
- → What are good serving suggestions with this cake?
Pair it with sparkling wine or a celebratory cocktail to complement its creamy vanilla and white chocolate flavors.